Features of Tape Measure App

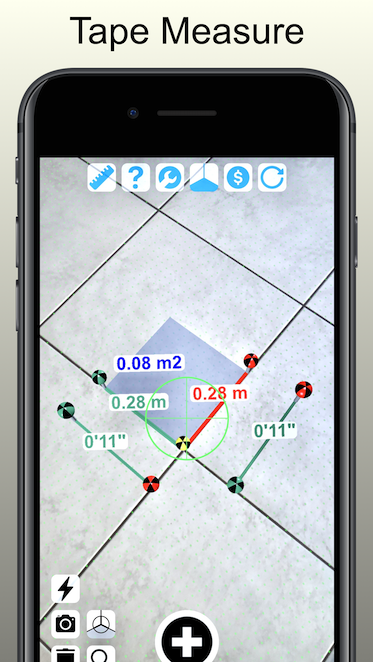
Tape Measure Camera Ruler allows to measure lengths, sizes, areas and heights with your iOS device. Forget about physical rulers and tape measures !

Length Measurement

Rectangular Area Measurement
This mode allows to measure rectangular areas along with its side lengths. It operates on horizontal and on vertical planes. You can have several of these measurements in the same scene.

Distance Measurement
This mode simply measures the distance from the camera to an object show by the camera. It operates on horizontal planes only.

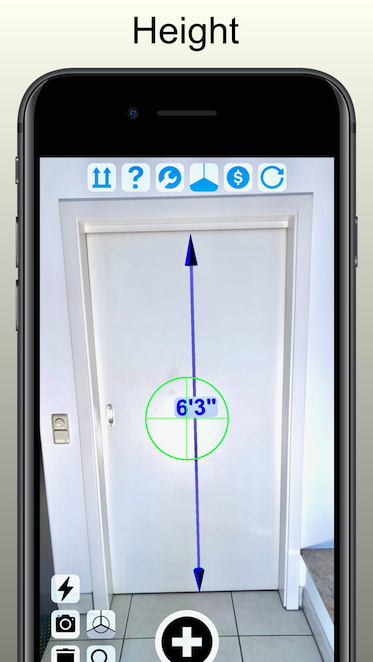
Height Measurement
This measurement shows upright heights. It always measures relative to the detected floor plane. In contrary to length measurement it measures always parallel to gravity (or perpendicular to the floor plane).

Floor Area Measurement
Floor area measurement is the most sophisticated measurement mode. It allows to place markers in the corners of a room. When all markers are set polygon is closed and its area is shown along with the length of its edges.

Imperial and Metric Units
You can display every length and area measurement in imperial and metric units. This can be set in settings.

Reposition marker pins
Every marker pin of the last measurement can be re-positioned after it has been set. This can even be done when the measurement is already finished. It applies for length and area measurements.

Business Model
We offer a free 7 day testing period where you can test Dictate without any fees. If you don't cancel 24h before end of trial period free trial is automatically converted into a subscription.
Tape Measure App Target Applications
General Operation & Handling

Initialize Button
The "Initialize" button is the very beginning of every measurement. When you push it, ARKit is completely reset and all former measurements are removed. In certain situations it can be helpful to push it, e.g. when the app refuses to detect a plane to measure on. You can push it at any time.
After ARKit is initialised you need to scan a plane. This is done by slowly moving your device to directing it to floor or wall plane you want to measure on.
Once a plane is detected it will be rendered as red, yellow or green dots in the plane. If the dots get green you are ready to measure and the "+" button will appear.
Please note that the more area you scan the more accurate your later measurements will be !

Add Marker Pin ('+') Button
This is the central button to add pin markers at the corners of your measurement object. The "+" button is hidden in situations where its use makes no sense, e.g. when no initial plane is detected, where you could place measurements on.

Done Button
The Done button occurs on the right of the "+" button in order to close a measurement area. After your last pin marker has been set with the "+" button you can connect the first with the last pin marker to close the polygon. You only need it on floor area measurement mode.

Remove Excess Planes Button
Sometime the device detects more than one plane at a time. These "excess" planes are shown in red dots and must be removed by the user. You can not have measurements on more than one plane. When you push this button the "excess" planes are removed, so that measurements make sense again on the remaining plane.

Move Marker Pins
For the last measurement it is possible to catch the marker pins and to reposition them. Just direct the cross hairs in the camera view to a pin and once you have it in focus the "+" button will turn into the "Move" button. You then can select the marker and move it to a different position. This is only possible for the last measurement made.
Menu Functions of the Main Screen

Select Measurement Mode
Press this button to select between measurement modes. A popup will show the available options. Please find more explanation on the different modes below.

Help
Help button display some basic video tutorials and a link to this online documentation.

Setup
Press Setup to open the app configuration screen. There you can select the measurement units and the sound feedback. For further details please refer to setup screen description below.

Select Plane Orientation
This button allows to switch between plane orientation horizontal or vertical. You have to set it into the right orientation, i.e. floor plane measurements are not possible in vertical orientation (of course).

Upgrade
This button opens the upgrade screen. Here you perform your In-App purchases or recover your previously made purchases (for free).
Available Measurement Modes

Ruler
The Ruler mode allows length measurements. You can have more than one measurement in one scene. Ruler is available in vertical and horizontal plane orientation.

Rectangular Area
The Rectangular Area mode allows area measurements of rectangular areas. The area is defined with 3 marker pins each sitting on a corner of the object. You can have more than one measurement in one scene. Rectangular Area is available in vertical and horizontal plane orientation.

Distance
The Distance mode measures the distance from the camera to the point shown in cross hairs camera focus. It just serves as a handy distance measurement tool. You can lock your measurement by pressing the '+' button, e.g. if you want to catch a screenshot of the scene. There is only one measurement at a time in this mode.

Upright Heights
Upright heights are always measured from the floor plane. That is the reason why you have to scan the horizontal floor plane before making any height measurements. Once you have a valid floor plane detected you press "+" to set the lower pin marker and then "+" to set the upper pin marker. These markers can be moved after the measurement is finished and you can have only one height measurement at a time.

Floor/Room Area
Floor Area mode offers area and length measurements of polygon areas. It is well suited to measure floor areas of rooms in buildings. Start putting pin markers in the first corner and then set one marker in each subsequent corner. When you are finished press the "Done" button to close the polygon. Please have a look into our video above to see how it works in real life. Each pin can be moved after the measurement If needed. You can have multiple measurements in one scene.
Special Function Buttons

Torch Mode on/off
In low light conditions you can switch on your flash light and use it to enhance the lighting conditions of the scene. Default is off.

Save Screenshot
Pressing this button just saves a screenshot of the current scene in to your photo roll.

Remove last point or measurement
If a measurement is under progress, this button will erase the last point set.
If a completed measurement is available, it will erase it as a whole.

Corner helpers on/off
In some situations you want to put a marker pin in a corner that is not entirely visible. In these cases please switch on the corner helpers. They will indicate edges which can help you to better estimate the exact position of the invisible position.

Loupe Magnification on/off
This button toggles the magnification function of the cross hairs loupe. Please note that on older devices it can be beneficial to switch it off due to its resource demands. Switching it off also improves readability of labels in the scene. You can toggle it at any time.
Functions on the Setup Screen
Select unit system
You can switch between metric an imperial units here. The settings applies for all subsequent measurements.
Audio Beep on/off
You can toggle the audio feedback on pin marker placements here.
Functions on the Upgrade Screen
Purchase Section
In the upper area you can can purchase the Pro upgrade. If you are already on Pro a checkmark is shown instead of pricing.
We offer a free 7 day testing period where you can test Dictate without any fees. If you don't cancel 24h before end of trial period free trial is automatically converted into a subscription.
Restore Purchases Link
If you are not on Pro you find a link to restore your purchase below the pricing information. Press this button if you want to restore a previously made purchase. You need this feature if in case of reinstall or device change your license is not correctly transferred.
All restore actions are for free, because you already have payed for them.
Other IBN Software Apps
In the lower part you will find information about other apps that are developed by IBN Software. You can click on the icons to get transferred to the corresponding App Store download location.


