
User Manual – Dictation App


1. Introduction
Overview of the App
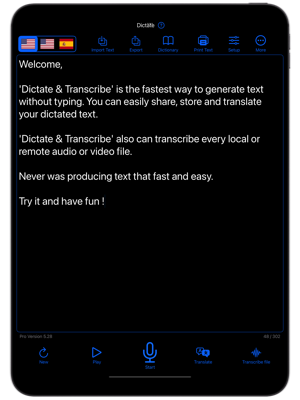
"Dictation - Speech to Text" is a powerful application for iOS, iPadOS, macOS and watchOS designed to convert spoken words into text with high accuracy. It leverages advanced speech recognition technology to transcribe your voice into written form, streamlining note-taking, writing tasks, and communication.
Key Features
Real Time Transcription
User Dictionary
Dictate offers a user dictionary where you can store words that are special to your business. Dictate incorporates them into your personal language model. This will increase the likelihood that these words are recognized correctly.
Audio Recording
Dictate offers support for storing the input audio along with the text transcription. Each time you append your text by dictation or file transcription Dictate will append that audio to the previous recording. Thus you get a full audio track of all your successive dictation sessions.
Audio File Transcription
Dictate supports file transcription. You can select audio files stored on you device and transcribe them into written text.
iCloud Drive & Device Sync
Dictate offers support to store and access your dictated text via iCloud. Of course your text still can be stored locally on your device. Furthermore using iCloud Drive your iOS & macOS devices synchronise their text. Text that is dictated into one device instantly appears on all other devices where you are logged in with the same AppleID.
Offline Dictation
Dictate has offline support for many languages. The feature is available on newer devices.
More Than 40 Languages
Dictate offers more than 40 languges, including: English, Deutsch, Nederlands, Dansk, Español, Français, Hrvatski, Italiano, Pусский, Magyar, Norsk bokmål, Polski, Português, Bahasa Melayu, Indonesia, Tiếng Việt, Türkçe, Català, Română, Slovenčina, Suomi, Svenska, čeština, 中文, 粵語, ไทย, 日本語, 한국어, עברית, العربية, Ελληνικά, українська
Parallel Dictation and Keyboard Editing
You can now edit while you dictate. This allows to correct small errors immedatelly after the occur.
Independent Text/Language Zones
Dictate offers 3 text zones which you can use for different projects. You can assign each text zone a different language when you need to dictate in different languages. Easily switch between text zones with one click.
Translation
Using the translation feature you can translate your text into any other supported language. Once translated you can send the text as usual.
System Requirements
Fields of Use
2. Getting Started
Download Dictate App
Onboarding
Furthermore, for Dictate to function properly, you need to grant permissions for microphone and speech recognition. You will be asked for those during onboarding. We highly recommend to grant those permissions during onboarding.
Text zone, text storage and language concept


Dictate offers 3 text zones, represented by flags indicating a language. You can think of each text zone as a different project. The text zones have a language assigned to it and you can only dictate in the text zones' language. When you click onto the flags in the main screen you just switch text zones. In order to assign another language to a text zone you need to go to Setup and change it by clicking onto the flags.
You can only have one text in each of the zones. To start a new dictation you need to 'save' your text by exporting or sharing it. Then use the trash button to empy the text field. Please note that this will no only clear the text field but will also delete the underlying text file.
Typical Dictation Workflow
- Press 'Delete' to empty the text field if there is an older text that you don't need anymore.
- Press 'Start recording'. This will show the audio signal indicators and anmiate the red microphone in order to indicate that Dicate is ready to transcribe your speech.
- Dicate your text by speaking to the microphone
- When finished press 'Stop recording'
- You can now edit your text by clicking into the text field and do some corrections.
- Now export your text by pressing 'Export'. This will show you an options menu. You can:
- Send your text to another app
- Share it via email
- Export it to a text file
- Export it to a PDF file
- Copy it to global clipboard
3. Basic Operation
Manual text editing
Click into the text field whenever you want to manually correct your text. This will popup the keyboard. You can position the cursor (insert point) and edit your text at any time. If you leave Edit mode by pressing the "Dismiss keyboard" button in the top bar, the next dictation will insert at the current cursor position in the text. This allows to insert text by dictation in the middle of your text.


Switch Text Zones/Languages
Using this selector you can switch your text zones. There are 3 text zones which can be used to work on different projects at the same time. Each text zone will store and recover its text when you switch it. You can think of each text zone as a separate 'file'.
Each text zone can be assigned a different language, so that you can switch the dictation language with one click. Note that you can set all 3 text zones to the same language. This way you can have 3 independent "projects" e.g. in your native language. For changing text zone language please see the 'Setup Screen' section below.
When using the iCloud storage model any text is synchronized to your other devices. That means you can start a project on your Mac and continue on your iPhone without any action to transfer the text. It is already there.
To use this feature you need to be logged in into your iCloud account and you need to give permission for Dictate to access it.
If you don't have more than one device you can safely switch off iCloud Sync. Please refer to Setup section below.
Please note that when you delete Dictate from your device your texts are also lost, if they are stored using the local storage model.

Setup Button
Press Setup to open the app configuration screen. There you can select the dictation language, the font size and en-/disable, the iCloud synchronization feature and much more. For further details please refer to setup screen description below.

More Button
Clicking 'Help' button opens a menu offering links to:
- Open Backup Folder
- Dictation Commands
- Online User manual
- Contact Support
- Upgrade
- Subscriptions

Import Text
Import Text allows the user to import plain text files into Dictate. For example you can load text that you have previoulsy exported to a file or you can load text from other sources. Please note that the text must be in the format 'text/plain'. Dictate will not load XML documents from Microsoft word or documents from Apple Pages !

Export
Export is the most important function (besides dictation). It allows to save or share your text. When you click the button a menu opens offering the following options:
- Send text by email (along with the recording, if configured)
It works best with Apple's Mail.app. Other email clients may or may not work correctly depending on whether they correctly implement 'sharing' functionality. Especially gmail and outlook do not work correctly. They put the text instead of the body into the subject, which is wrong but cannot be changed by us. Consider migrating to Apple Mail.app if you rely on sending text (and audio) via a mail client. - Share text to another app
- Share audio recording
- Save to PDF file
- Save to text file
- Copy text to clipboard
If you experience that your recording instead of your text is shared please disable 'Share audio' option in setup.

User Dictionary
You can insert words and phrases that are not recognized correctly by Dictate. Words contained in the user dictionary will increase the likelyhood of being correctly recognized during dictation. Please note that there is no guarantee that this will work perfectly. You can use it as a hint for unusal words or phrases.
Enter your words using the text entry field.

Print Text
This will open a printer dialog. In order to print from iOS devices you need an already configured printer.
Note you can control the text font size for printing in the Setup screen.

New Button
Press the 'New' button to erase your current text field and start over with an empty text field. A security requester will ask if you are sure. If you say "Yes" there is no way to recover your previous text. Delete not only erases the text field but also the underlying text storage as well as the audio recording. Should you need your previous text or recording you must "Export" it, either to file, email, PDF, etc.

Play Button
Press the 'Play' button once to re-play your recording. Press it a second time to hide the player again. You can change the playing position with the slider.

Start/Stop Button
Press this button to start and stop dictation. Dictate has no recording time limits. Your dictation will be converted to text in realtime while you speak. In addition a recording of your dictation is made which can be played or shared after you have finished your dictation. If you already have text in the text field, another dictation will be inserted at the cursor position. Please note that subsequent recordings are always appended at the end of the previous recording.

Translate Button
Push this button to translate your text. Please note that the translation text length is restricted to 8000 characters depending on your device. On modern iOS/iPadOs devices longer translations may work.
A new window will appear containing the translated text. You can send/export it as usual.
To change the target language for the translation, click on the flag on top of the translation screen and select the language.

File Transcription
This function allows to transcribe audio/video into text. For more details please see section 'Advanced topics' below.
Configuring Dictate App


Dictation Settings
Here you can setup the speech to text languages for each text zone independently. There are more than 40 languages available.
You can select a different language for each of the 3 text zones or select the same language for all text zones in case you don't want to dictate in several languages.
Language is changed by clicking onto one of the 3 flags. These correspond to the 3 zone selection flag shown on the main view.
1. Select the text zone (pressing one of the flags) for which you want to change the language.
2. Select the language using the language selector.
The selected language is immediately assigned to the selected text zone. For easy visualization the 3 text zones are shown with flags representing the selected language. The same applies for the main screen, where you can switch easily between your configured languages.
- Automatic punctuation
This will enable automatic puctuation during dictation. Note that this is not applicable for editing. - Insert double spaces
This will insert two spaces instead of one after each puctuation sign. - Record on app launch
This will start the recording immediatly after app launch without requireing you to click 'Start recroding'. - Auto Delete Text on Record
This will delete your last dictation and empty your text field each time you 'Start recording'. Use with care because it will clear the text field without safety requester.
Privacy Settings
However - before enabling it - please note the following restrictions:
- Privacy mode only works for certain languages
- Privacy mode only works on certain devices
- Privacy mode devlivers much worse transcription than non-privacy mode. That is the reaseon why its default if "off".
Audio Settings
- Auto select audio input
This setting controls which audio input device is used for dictation. When switched on, the device selects the most appropriate input device. When switched off you can select your preferred audio input device. If the selected device is currently not available (e.g. for BT microphons) Dictate falls back to the internal microphone. - Select priority audio input
In case you have more than one audio input connected to your device you can select which device will be taken by Dictate. - Share audio files
You can share the recordings along with your text to certain applications. This settings controls if audio recordings are shared along with your text. When switched off only your text is shared. Please note that it depends on the receiving app if recorded audio can be shared or not. Apps not capable of handling audio files won't receive the recording although this setting is switched on. In this case only the text is transferred.
Screen Settings
Here you can set the font size of the text field, the printer font size and the button sizes shown in the main screen.
Further, you can hide the button captions in case you are familiar with the button functions and want to free the space used by the captions.
These settings are especially helpful for disabled persons which can select very large font sizes and/or button sizes to improve the readability.
Storage Settings
- Migrate to iCloud storage / Migrate to local storage
Here you control where to store your text. You can select to store text on your iCloud or locally on the device. Please note that when you select 'iCloud' text is stored in your private iCloud Drive, which is not public. In order to synchronize between your devices your need to select iCloud. For locally stored text synchronization is not possible. - Create backups
When switch on Dictate stores up to 40 text backups in a backup folder. In case you loose text you can restore it from these backups. You can easliy navigate to the backup folder using the menu "More->Open backup" folder ! - Open storage location
Click here to navigate to the storage location where Dictate internally stores your text. You will also find the backups folder here.
Email Settings
- Disable screen lock
This will disable the auto screen lock of your device even when you are NOT currently making a recording. Use it with care since leaving the device in this mode might drain you battery fast. It is intended for visual impaired users. - Copy text to clipboard on exit
This will automatically copy your whole text from the text field into the clipboard each time you terminated or leave the app. This is a convenience function for power users who want to insert the text in another app fast. Please note that this can interfere with manual selections you want to transfer to another app via clipboard. If unsure switch it off! - Safety Requester on Clear
This will enable or disable the safety dialog when you delete your text field. Handle with care, since disabling it will immediately delete your text, which can not be recovered (except you have backup feature enabled). - Delete all language models
This will delete all your downloaded language models. Please note that when you delete them you have to re-download them in case you transcribe using whisper file transcription mode. - Reset user preferences
This will delete all your settings and put Dictate into 'factory settings'. This can be helpful if you encounter problems with Dictate not storing your language settings or when problems occur restoring purchases.
Other Settings
- Disable screen lock
This will disable the auto screen lock of your device even when you are NOT currently making a recording. Use it with care since leaving the device in this mode might drain you battery fast. It is intended for visual impaired users. - Copy text to clipboard on exit
This will automatically copy your whole text from the text field into the clipboard each time you terminated or leave the app. This is a convenience function for power users who want to insert the text in another app fast. - Safety Requester on Clear
This will enable or disable the safety dialog when you delete your text field. Handle with care, since disabling it will immediately delete your text, which can not be recovered (except you have backup feature enabled). - Delete all language models
This will delete all language models you have already downloaded. Can be helpful if a download was interupted and is incomplete. - Reset user preferences
This will delete all your settings and put Dictate into 'factory settings'. This can be helpful if you encounter problems with Dictate not storing your language settings or when problems occur restoring purchases.
Purchasing/Handling your license
Subscription Section
Press the wanted product and you will be guided through the purchasing process.
If you are currently subscribed your subscription details will be shown above the product offerings. You cannot purchase a product twice. If you already are subscribed to a product clicking on the purchase button will just restore this purchase for free.
We offer a free 7 day testing period where you can test Dictate without any fees. If you don't cancel 24h before end of trial period free trial is automatically converted into a subscription.
On iOS/iPadOS you can manage your subcription by clicking Help->Subscriptions. This will open the subscription page provided by Apple. Here you can cancel your subscription. Note that you are entitled for the while subscription period even if you cancel way before the end of the subscription period.
You can find further information (including macOS) about subscrption management here: https://support.apple.com/en-us/HT202039
Restore Purchases Button
Press this button if you want to restore previously made purchases. Normaly expired subscription are renewed automatically on opening the upgrade screen, but life long Pro Versions are not. If you own these and did a reinstall of Dictate or got a new device you have to restore by pressing this button.
All restore actions are for free when you already have payed for them.
4. Advanced Topics
Dictionary
The user dictionary allows to fill in user specific words or phrases that are not recognized well. You just type in your words one by one. Each time you start a dictation your personal language model is created and Dictate tries to recognize your personal words.
Please note that this is on a best effort basis, so there is no guarantee that your words are recognized when you put them into the dictionary.
File/Media Transcription
Dictate offers 3 transcription methods, which you select on top of the transcription screen:
- Whisper (openAI) transcription
- Fast (Apple) transcription (for languages that do offer onDevice transcription)
- Realtime (Apple) transcription (for languages that don't offer onDevice transcription)
Prefer Whisper transcription when you have interview or meeting situations, background noise and nobody is speaking dictation commands. Use it when you need timestamps or speaker diarization.
Prefer Apple transcription methods when you need to use dictation commands (for formatting, puctuation, etc.) and when you can ensure that you are the only dominant speaker. It will not work with background noise. It will not work for room, meeting, interview or video conference recordings !!! Apple file transcription is optimized for voice memos made with the speaker directly in front of the microphone. It will also do not a good job with loud speaker transmitted recordings, even when the perceived audio quality is high.
Note further that file transcription may be slow on older devices.
Dictation Commands
In the Dictate app you can display the localized dictation commands by clicking Help->Dictation commands. For your information you will find a subset of commands here:
Commands for Mac:
https://support.apple.com/guide/mac-help/mh40695/mac
Commands for iOS:
https://support.apple.com/guide/iphone/iph3bf19d7b9/ios
Text Synchronization Across Devices
Prerequisites for text synchronization
- You must use the same on all devices.
- You must have enabled iCloud Drive on all devices
- You must have migrated all the Dictate app installations to iCloud storage model. Go to 'Setup' to do this.
- The devices must be online to synchronize. If you are offline your changes are queued until the devices gets online next time.
Text Storage File Locations
Although it is not recommended you can access your dictations as a text file at the following filesystem locations. The exact location depends on your selected storage model (iCloud or Local) and on the platform (macOS or iOS). Attention ! These files are owned by Dictate app. You should not move, delete, rename or change them. You can view then, though.
iCloud storage model
The Dictate app will create a Folder 'Dictate' on your iCloud Drive as soon as you enable the iCloud storage model in the app settings. All your text can be found inside this folder. The filenames are fixed: 'textzone_A.txt', 'textzone_B.txt' and textzone_C.txt' respectively. You should not change them, they are maintained by Dictate.
You can access these files on:
- iOS via the iOS 'Files' App or any other app using iCloud Drive
- macOS via the Finder -> iCloud Drive -> Dictate
Local storage model
In Dictate app go to "Setup" and click "Open storage location" to navigate to your files. This will open the "Files" app at the correct storage location.
Backup file locations
Backups are available in a sub folder of the storage location, (s. above). For convenience you can navigate from within Dictate by clicking menu item:
More->Open backup folder
There will be a maximum of 40 backup files for each textzone. As new backups files occur in the folder, the older ones are deleted to keep the number of files less than 40. Backups are made when you close the keyboard and when you finish a recording by pressing the stop button.
6. Contacting Support
More->Support Request
Please provide a full problem description with information about the state of the app, i.e. 'recording', 'editing', 'setup', 'transcription', 'purchase screen', etc. Please understand that we cannot answer requests that only state "does not work" or the like. A full problem description is needed to help !
For the support request to work you need to have a configured email app. Dictate by itself does not send the email. It does hand it over to Apple Mail app.